
How to install JDK in your Computer?
If you want to run the Java Hello World Program, then before running the program you need to install JDK in your Computer.
In this post I will guide your step by step How to Install JDK in your computer as well as I will demonstrate you how to install Integrated Development Environment(IDE) and text editor to run the Java Program.
How to install JDK in Linux Operating System?
In the first section of this post I will guide you How to install JDK in Linux Operating System and how to setup for the IDE and Text editors. You can also watch the below video for more understanding.
I am showing you the very easiest method to install JDK in Linux. The Steps to install JDK below here:
Step 1: Simply Open your Terminal from you Application Section or from the Search Bar.
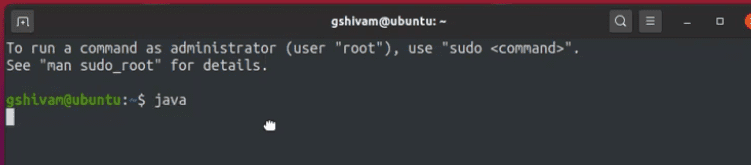
Step 2: First Check JDK is installed or not in your system, so write java in the terminal as the Command and hit Enter.
If the JDK in installed then you get some JDK related commands descriptions same as image below.

Step 3: the JDK is not installed into you System then Terminal returns some JDK installation related commands to install JDK shown in below image.

Simply Select the very latest version command from the given commands. As June, 2020 the latest version of java is JDK 14.0.1 so i am selecting the very last command from the given commands i.e. sudo apt install openjdk-14-jre-headless it may be differ if you are going to install JDK later so always first hit the Java command and then check which is the latest version and install it.
When the JDK is installed then write java -version to check the java version, you had installed.
Installation of IntelliJ IDEA (IDE):
An Integrated Development Environment (IDE) is a System Software that facilitates the programmer for Software Development. An IDE consist of the Code Editor, Compiler and Debugger.
For Java Development we are going to install the IntelliJ IDEA. For installing the IDE open the Ubuntu Store (As i am using ubuntu as my Linux Distribution, you may choose yours) and Search for IntelliJ IDEA.
IntelliJ IDEA has 3 variant’s for Java:
IntelliJ IDEA Community Edition – This is free.
IntelliJ IDEA Ultimate Edition – Free for 30 Days Trial then Chargeable
IntelliJ IDEA Educational – Same as Community Edition but have in-built Plugin for Practice Java.
Here, we are going to install IntelliJ IDEA Community Edition for Java development.
Simply Click on the IDEA Community Edition and then Select the Install option.

After, When installation completely done the you can simply open and setup the IntelliJ IDE.
Similarly, IntelliJ IDEA Community Edition you can search for Visual Studio Code as the Text Editor in Ubuntu Store and install it as well.
You can also see how to setup the IDE by watching the below video.
How to install JDK in Windows Operating System?
If you know how to install JDK in Linux Operating System then in Windows, it’s completely different while in ubuntu we are using terminal to install JDK, here we use to download the Java JDK file then need to perform installation process.
We will guide you in each and every step to install JDK and The IDE in you Windows System if need further assistance then you can also refer the below video.
Step 1: First open the browser an Search for Java SE Download. The vary first link from Oracle you can Select and open the link. You will also follow the link to download the JDK : JDK Download

Step 2: Select the Java SE 14 and select JDK Download in the same tab. Select the installer for Windows i.e. Windows x64 Installer and click the link and then accept the T&C then click Download.
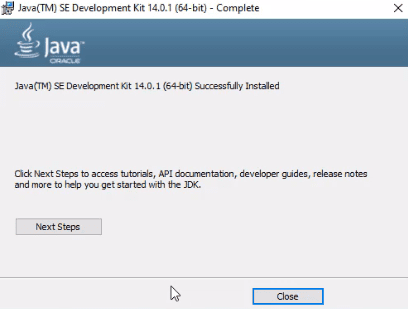
Step 3: After successfully downloading the software double click the software file and follow the instruction to install the JDK into the Windows machine.
Step 4: After Installation is completed then you need to Set the PATH VARIABLE for the Java, so for the same copy the path of the installation directory of Java. in my case it is : C:\Program Files\Java\jdk-14.0.1\bin
Then go to your This PC Section right Click on the screen and Select properties.
Then select the Advanced Systems Settings.
After a popup will appear, select Environment Variables.
After find the Path / path / PATH variable and then add your Java path into that variable into both User variables and System Variables.
for assistance you can also go through the video.
If you want to verify that JDK is installed correctly or not open your CMD then type java -version then it will show you the JDK version. In the below image it’s show you prpperly.

Installation of IntelliJ IDEA (IDE):
as we already discussed about the IntelliJ in the above. we will continue to downloading and installing the IntelliJ IDEA Community Edition IDE.
Simply search for the IntelliJ IDEA then follow the first link from the Search i.e. from the jetbrains. You will also download the IntelliJ IDEA by following the link: IntelliJ IDEA
Select the Download option and then select the community Edition to download the software.
After Download complete double click on the downloaded file and follow the steps. If you need the further assistance to install the IntelliJ and setup the JDK the follow the video link below.
same as IntelliJ, Download the Visual Studio Code and install it. you can also download the Notepad++. Notepad++ is also the best alternative for visual Code Editor.
You can also watch the video below to download and setup the JDK, IDE and the Code editor.
Hope you understand the installation process for JDK, IDE and Code editor. If you need any other further assistance How to install JDK in your Computer then simply comment in the below section.
You could find the below post useful for your knowledge:
- History of Java
- Java Programming Language
- Christmas Tree Pattern Program
- Data Structure in Java
- Queue implementation in Java
- Pattern Programs in Java
- Feature of Java
- Java Hello World Program


